前言
Hexo + Obsidian 的好处
- 知识库与博客一体化:Obsidian 可以作为知识库,而 Hexo 则用于将知识库中的内容转化为博客,这种方式可以将个人笔记和公开分享的内容无缝对接
- 灵活的内容筛选:可以通过目录将部分笔记标记为”分享”或”不分享”,方便管理
通过GitHub Actions可以进行自动部署,并且能将笔记存储在GitHub中
接下来来看看应该如何实现吧
创建一个Hexo博客项目
官网:Hexo官网
1
2
3
4
5
6
7
8
9
10
11
| // 直接使用npx创建,project_name为自定义命名
npx hexo init project_name
// 等待创建完成,进入项目文件夹中
cd projetc_name
// 使用包管理器安装依赖
pnpm install
// 项目启动
pnpm run server
|
项目启动成功界面:

GitHub Action部署
在GitHub Pages上部署Hexo
使用GitHub Action部署Hexo本质上是一个CICD流程,接下来让我们实践一下
首先需要在GitHub上创建远程仓库,将本地仓库与远程仓库关联,推荐在 main分支(默认分支)上
在根目录下创建.github/workflows/pages.yml文件,按需修改文件中对应部分(触发分支、Node.js版本、子模块配置…)
1
2
3
4
5
6
7
8
9
10
11
12
13
14
15
16
17
18
19
20
21
22
23
24
25
26
27
28
29
30
31
32
33
34
35
36
37
38
39
40
41
42
43
44
45
46
47
48
49
50
51
52
53
54
55
56
57
58
59
60
| name: Pages
on:
push:
branches:
- main # 触发分支
jobs:
build:
runs-on: ubuntu-latest
steps:
- name: Checkout
uses: actions/checkout@v4
with:
token: ${{ secrets.GITHUB_TOKEN }}
# 如果你的项目依赖于子模块,请看: https://github.com/actions/checkout
submodules: recursive
- name: Use Node.js 20
uses: actions/setup-node@v4
with:
# Examples: 20, 18.19, >=16.20.2, lts/Iron, lts/Hydrogen, *, latest, current, node
node-version: "20"
- name: Cache NPM dependencies
uses: actions/cache@v4
with:
path: node_modules
key: ${{ runner.OS }}-npm-cache
restore-keys: |
${{ runner.OS }}-npm-cache
- name: Install Dependencies
run: |
# 默认使用淘宝源
npm config set registry https://registry.npmmirror.com
npm install
- name: Build
run: npm run build
- name: Upload Pages artifact
uses: actions/upload-pages-artifact@v3
with:
path: ./public
deploy:
needs: build
permissions:
pages: write
id-token: write
environment:
name: github-pages
url: ${{ steps.deployment.outputs.page_url }}
runs-on: ubuntu-latest
steps:
- name: Deploy to GitHub Pages
id: deployment
uses: actions/deploy-pages@v4
|
成功创建并修改文件后将代码push到远程仓库
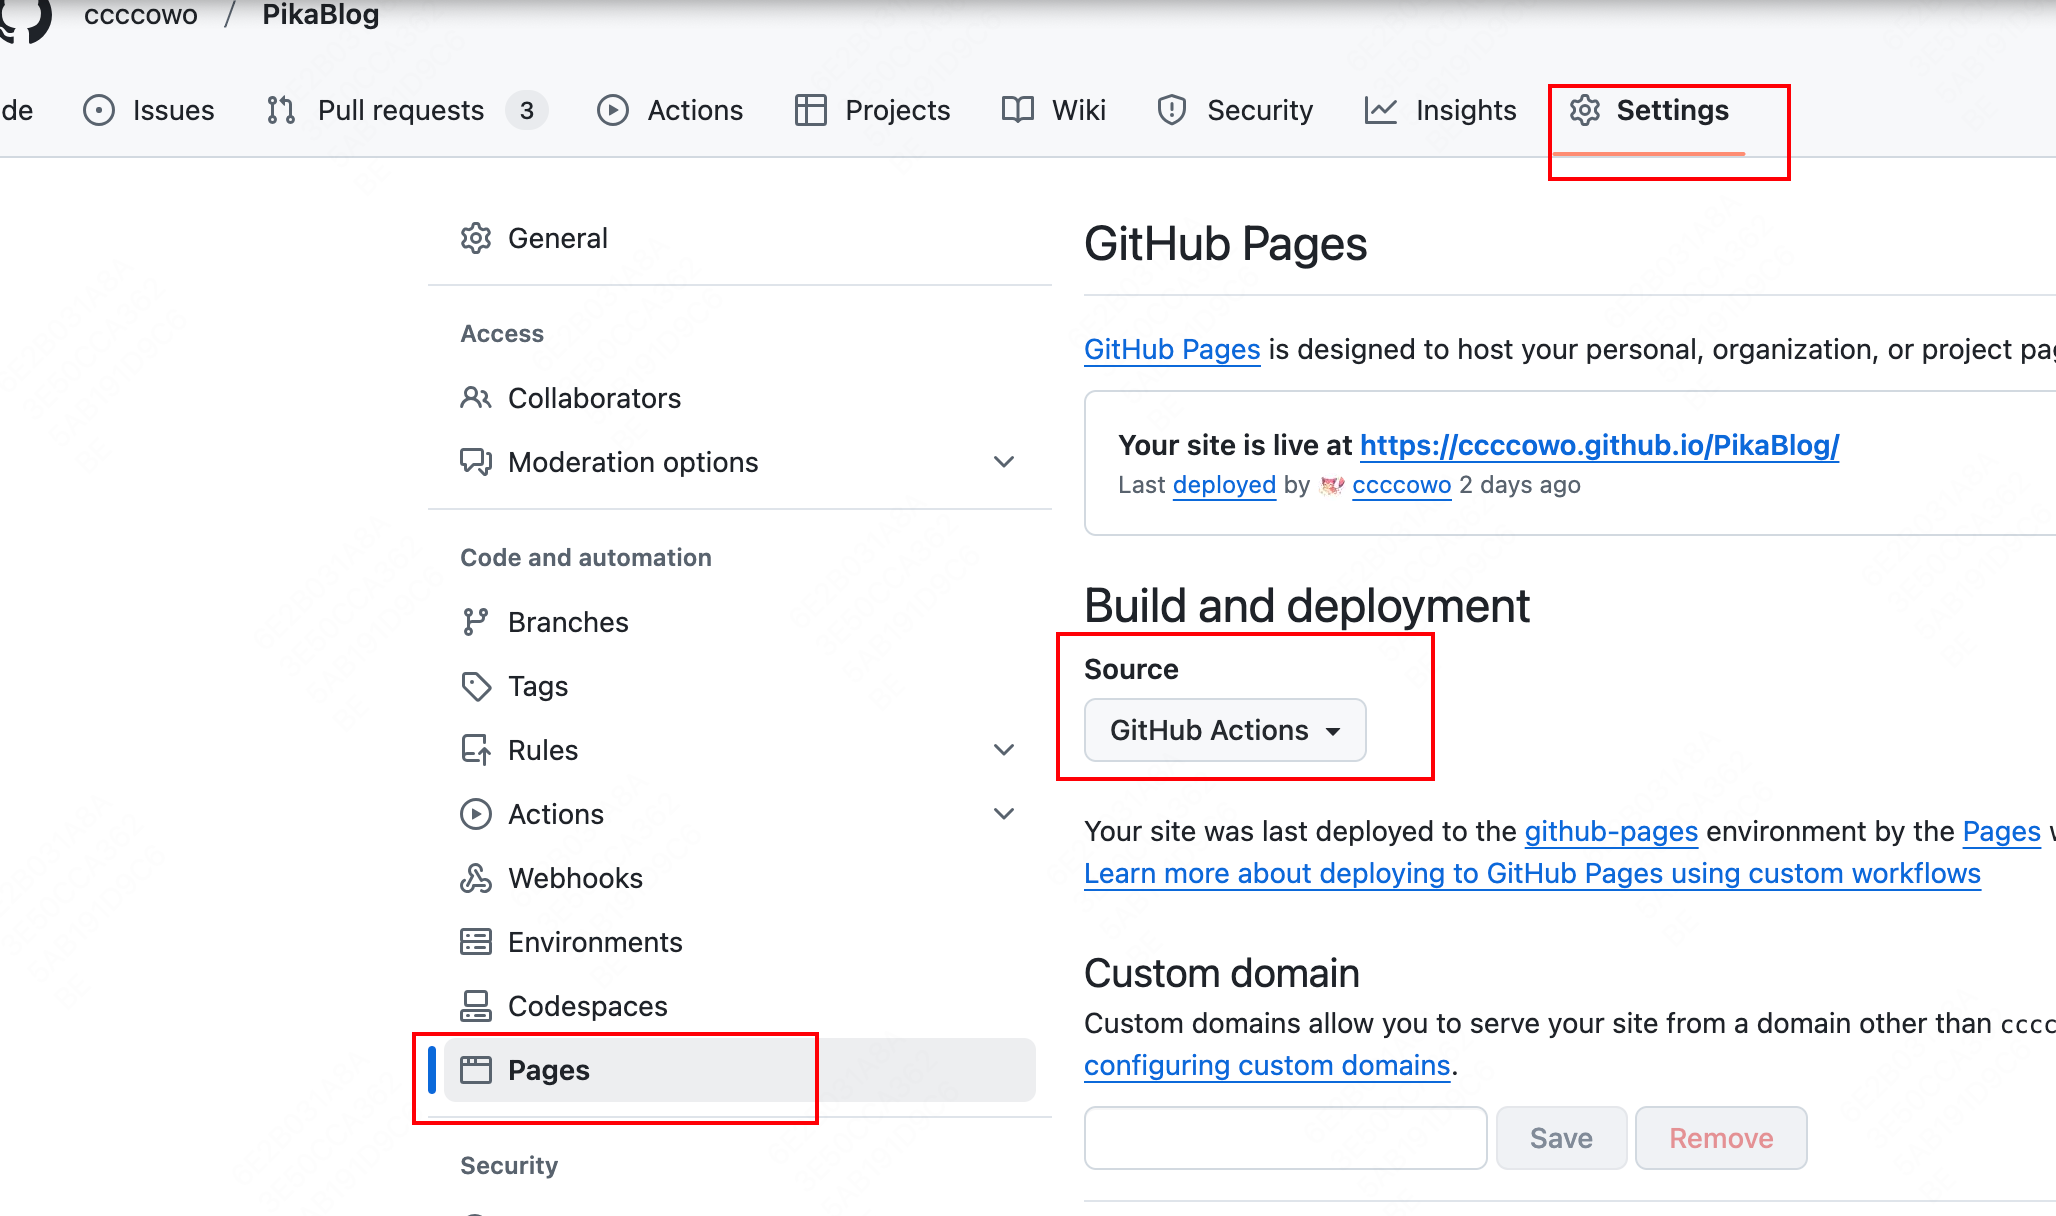
在远程仓库中前往 Settings > Pages > Source ,将 source 更改为 GitHub Actions,然后保存
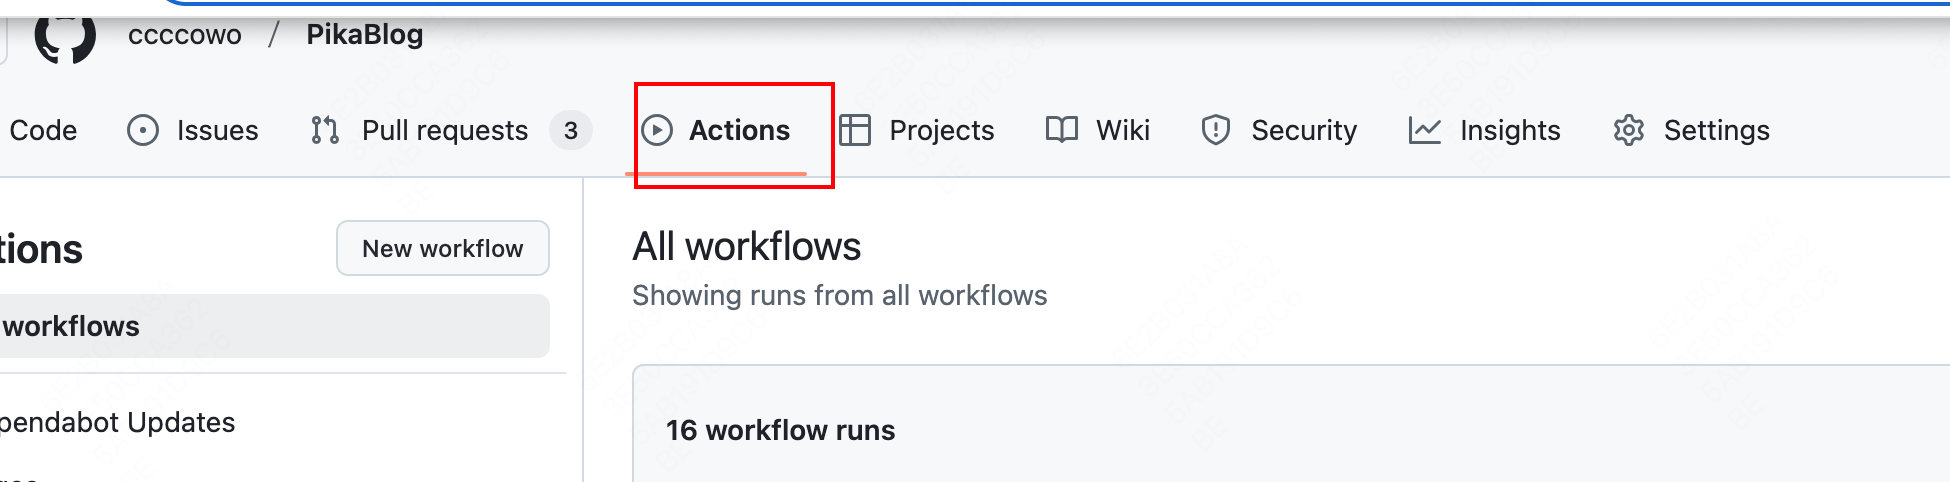
可在Actions中查看CICD情况
部署完成后,前往 username.github.io 查看网页
Obsidian与Hexo联动
Obsidian
Obsidian是一款本地存储的markdown语法的笔记,以仓库的角度来管理文档以及插件
将Hexo中的source文件夹作为仓库在Obsidian中打开,即可实现知识库与博客一体化效果
Obsidian的基础配置请查看Obsidian使用手册
笔记是否分享
我们采用以下方法来增加「控制笔记是否分享」的功能:
在 Obsidian 的笔记中,通过 YAML Frontmatter 添加自定义字段来标记笔记是否分享
1
2
3
| ---
share: true # 或 false
---
|
可以将该字段添加在模版中
在 Hexo 的构建脚本中,可以通过解析这些 YAML 标签来决定是否将某篇笔记生成为博客文章
如果有主题,在根目录scrits文件夹下 (如果没有就创建一个)创建 share-filter.js文件,在其中添加过滤逻辑
1
2
3
4
5
6
7
8
9
10
11
12
13
14
15
16
17
18
19
20
21
22
23
24
25
26
27
28
29
30
31
32
33
34
35
36
37
38
39
40
41
42
43
44
45
46
47
48
49
50
51
52
53
54
55
56
57
58
59
| 'use strict';
// 立即执行的代码
console.log('正在加载脚本文件...');
console.log('过滤器插件已加载'); // 检查插件是否加载
// 确保 hexo 对象存在
if (!hexo) {
console.error('hexo 对象未定义!');
return;
}
// 只在文章渲染前检查
hexo.extend.filter.register('before_post_render', function (data) {
// 如果没有设置 share,默认为 false
if (typeof data.share === 'undefined') {
data.share = false;
}
// 如果不分享,返回 null 阻止渲染
if (data.share === false) {
console.log(`跳过文章: ${data.title}`);
return null;
}
console.log(`生成文章: ${data.title}`);
return data;
});
// 在生成前过滤文章
hexo.extend.filter.register('before_generate', function () {
console.log('开始过滤文章...');
// 获取所有文章
const posts = hexo.locals.get('posts');
// 过滤文章
const filteredPosts = posts.filter(post => {
// 如果没有设置 share,默认为 false
if (typeof post.share === 'undefined')
post.share = false;
if (post.share)
console.log(`保留文章: ${post.title}`);
return post.share === true;
});
// 更新文章列表
hexo.locals.set('posts', filteredPosts);
});
// 监听文件变化
hexo.on('generateBefore', () => {
// 强制更新 locals
hexo.locals.invalidate();
}
);
|
这样就可以通过设置share字段来控制文章是否在博客上显示出来
图片处理
Obsidian 中的图片默认使用的是Wiki链接
1
| ![[Hexo + Obsidian:解决图片问题]]
|
但是hexo 博客里只支持 markdown 原生的图片引用格式
1
| 
|
所以就导致图片不能在Obsidian和hexo中同时显示,针对这个问题我们有两种方式
第一种是使用图床,将我们博客中的图片全都上传云端存储起来,博客图片为这些图片的地址,这样无论md文件在哪图片都可以正常显示,详细操作方式可见
Site Unreachable
PicGo腾讯云COS配置可查看:对象存储 使用 PicGo+Typora+COS 搭建图床服务-实践教程-文档中心-腾讯云
还有一种方式如下,还是在本地存储图片
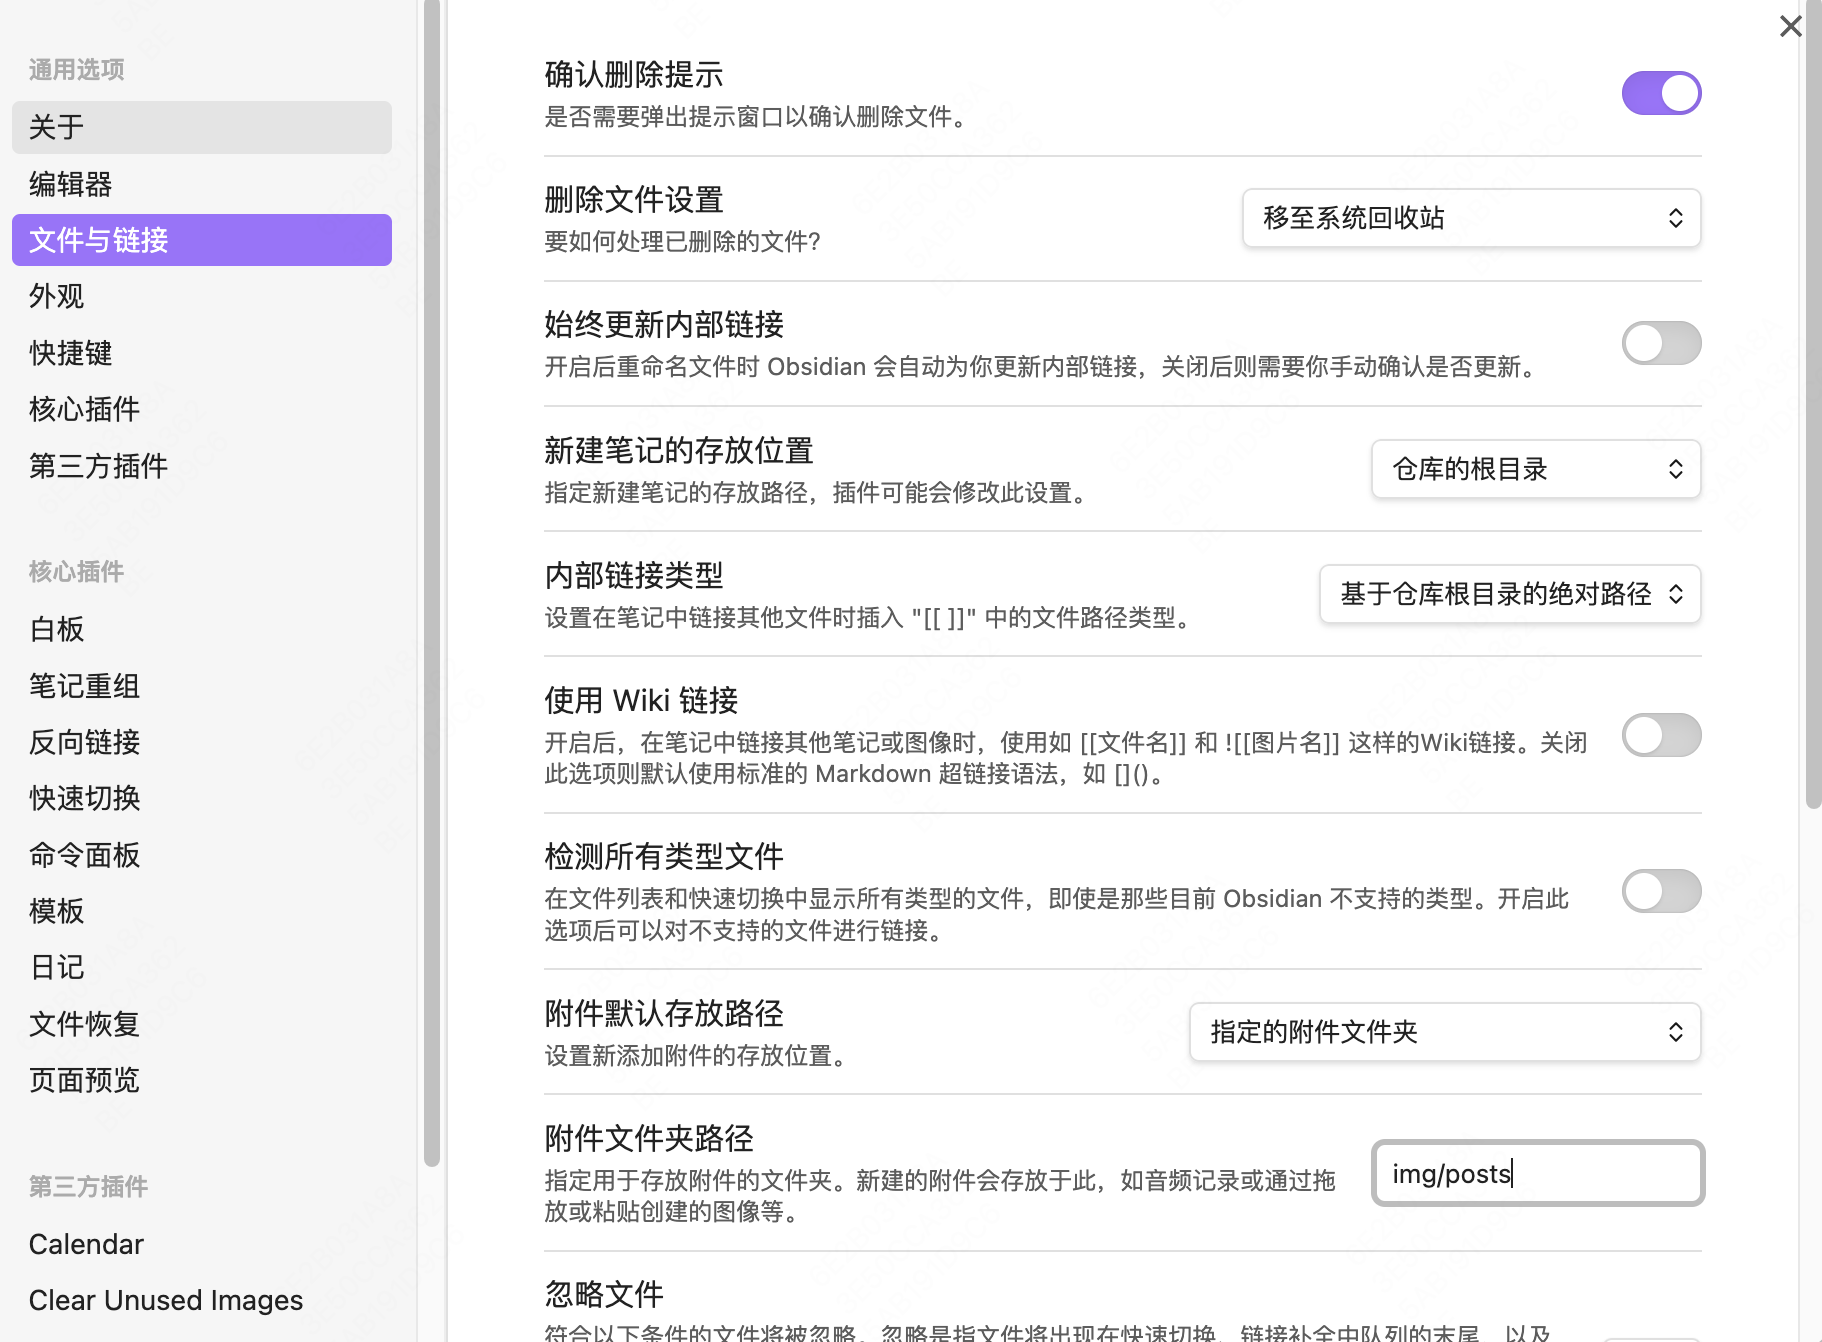
解决步骤:
- 注意我们的根文件夹是
source
- 打开设置中的文件与链接
- 将内部链接类型修改为「基于仓库根目录的绝对路径」
- 关闭「使用Wiki链接选项」
- 指定附件文件夹为
img/posts,文章中粘贴的图片将会默认保存在指定附件文件夹下。这只是我的指定,只要确保在source文件夹下即可